Today I'm taking a little break from our before and after series to show off a project I wrapped up not too long ago. Don't worry, it'll be back soon...
Showing posts with label paint. Show all posts
Showing posts with label paint. Show all posts
Quick DIY Cork Coasters.
February 06, 2015
Here and there I've been working on our master bedroom refresh. I promised myself and even declared to the blog-world that I would finish the space by the end of the year, but it just didn't happen. I'm getting close. As you can see here, it's all about the details now. Once I check a few more things off my to-do list, I'll finally be D-O-N-E!!!

The thought of ruining one with a water ring makes me cringe.


What's left, you ask? Finding the right pillows (I've been on the pillow hunt for more time than I want to admit...I've fallen in love, but my budget never got the same warm and fuzzy feelings), DIY'ing some jewelry storage, pretty-ing up our exposed lamp cords (with paint or a DIY cord-cover project) and a DIY art canvas.
Since I've talked enough about what ISN'T done, let me prop myself back up on what I've actually finished: upped the cozy factor in our room with dark walls, installed our DIY lucite curtain rods, painted our DIY curtains, hung our TV gallery wall (sneak peek here), stenciled our gloss-on-matte accent wall (sneak peek here), hung our wall lamps, swapped out our focal point mirror, painted our old leaner mirror and DIY'ed some simple coasters for our nightstands.
You see, hubby and I drink a ton of water...and every night we each have a bottle or glass of water next to us in bed. Normally I wouldn't be such a freak about putting a drink on a side table, but these "nightstands" are one of my favorite Craigslist makeovers I've ever completed.
The thought of ruining one with a water ring makes me cringe.
So the easiest/cheapest/most-stylish solution I could come up with was painting a 4-pack of cork coasters from Michael's.
This project took all of 10 minutes, is embarrassingly easy and pretty much self-explanatory, so I feel silly even posting about it, but hey, I love how they turned out...so why not show them off?!
First, I gathered my supplies: 1) the coasters, 2) some left over paint samples and acrylic paints, 3) old paint brushes, 4) painters tape, 5) liquid gold leaf, 6) Krylon clear finish spray and 7) an old piece of cardboard to paint on.

Then I taped off different areas on the coasters and started painting! I didn't have much of a plan for shapes or color placement. I just crafted without thinking or measuring.
Once everything was painted, I used a Krylon clear spray to lightly coat each coaster 2 times to protect my award-winning paint job.
After the coasters dried, they were ready to go! I love the colors and how pretty they look compared to the folded over paper towels we were using. ;)

High-five for super-simple, cheap projects!!!! Happy Friday, friends! :)

Modern Masters Metallic Paint Review & {Giveaway}!!
May 17, 2013

I headed to their website, and was immediately impressed with the number of colors they offer. I had quite the difficult time narrowing down which I wanted to try out, but after a great debate, I made my choices...and then stalked my mailbox until my package arrived. ;)
My thoughts then turned to what I wanted to try the paint on. Luckily, I was in the middle of a project that could benefit from a little metallic paint.
We had a large wooden tray that needed a major makeover. {Yes, I had already started sanding when this "before" was taken...whoops!}

I sanded and re-stained the piece because the undertones were a little too red for my liking, and the cup rings were not the prettiest thing to look at.

Once that was dry, I tapped off {and aluminum foil-ed off} the areas of the tray I didn't want to get paint on. Then I grabbed a couple different widths of stencil tape from my craft basket and started laying out patterns. {And before you ask...nope, I didn't measure a thing. I just eyeballed everything to make sure it appeared even. One of my requirements for this design was that I did NOT want to have to measure a. single. thing.}

After all the tape was down, I used an exacto knife to cut away the pieces I didn't want.

Then I took my tray outside and gave it two coats of gold spray paint and primer {Rustoleum's Universal in Pure Gold...best gold spray paint out there...in my opinion, of course}. I wanted the design to appear pretty opaque, and I wasn't sure how sheer the metallic paint would be. So I figured, better to prime the surface and be safe, rather then sorry!

Once the spray paint dried, I pulled out the new paint...woohooooo! {I used Brass - ME289.}

I placed a few small blobs of paint onto the tray and rolled 2-3 coats on, waiting only a few minutes in-between each of them.


Then I peeled back the tape to see things unfold...


It's amazing what a little metallic paint can do, huh?

And now for my honest opinion of this stuff....it rocks!! I was hooked after the first coat of it went onto the tray. The paint is incredibly easy to work with, the finish is beautiful and a little bit goes a long way with this stuff!! In fact, I was so smitten with it after completing our tray, that I immediately started working on a couple wooden signs for some special blog ladies in my life...and thennn I used it on a couple gallery wall additions for our hallway!


Word even got out to a friend of mine that I loved the paint so much, that she graciously volunteered a table of hers to be made over with the Blackened Bronze - ME238 Shade. ;) Keep a look-out for the reveal of that next week, and enter my very first giveway below!! :) One super lucky reader will win their choice of either one quart and 6 oz. container of any color OR four 6 oz. containers of any color OR a metal effects kit {one pint primer, one pint reactive paint, one 4 oz. solution or rust activator, one spritzer cap, one pint of Permacoat Xtreme for rust only} from Modern Masters!! :)
Good luck everyone!
**All opinions in this post are 100% mine...I'd never lie to my amazing readers!!**
Still Lovin' Our Neighbors!
August 16, 2012
Back in April, I posted a project that had absolutely nothing to do with our home improvement, but instead, focused on our neighbor’s house. :) They were in serious need of an exterior paint job, and we {including my parents} were ready and willing to help out! It took just one sunny Saturday, and the six of us managed to double-coat their house and give it a much-needed facelift! The results were fantastic, but the transformation didn’t end that day. I had mentioned that they were going to add an accent color {in the cranberry family} to their front door, and they were also getting some new, black shutters. A few of you commented that you’d love to see their place with everything completed, and now that it’s complete {okay, okay…it was done probably a month and a half ago} I am happy to oblige!
Here it was after we painted back in April...

...and here it is today! Quite the charmer, don’t you think? :)


Friggin' File Cabinet...
August 09, 2012
Yup, I said it…friggin’ file cabinet. There are so many attractive, don’t-even-look-like-I-belong-
in-an-office options out there…but all of those come with a price tag I hate to even think about. Heck, even some of the not-so-attractive options can cost a fortune! But expensive or not, I knew we needed one for our home. The cheapo cabinet I made due with since I was a single gal was not only broken, but also wouldn’t provide the filing space we will need as our family {God willing} continues to grow in the future.So what was I to do? Simple...it’s something I had done a million times before. I became a Craigslist stalker {in a totally non-creepy, furniture-needing kind of way}. I scoured the ads daily to find a lateral file cabinet made of wood or wood laminate. These two qualities would help mask the “hi, I’m a file cabinet” appearance. This was important to me since we do not have a designated office space in our home. {We could make one of the guest rooms double as an office, but the truth is, we wouldn’t use it. We are more casual and tend to sit on the couch or at the dining table to get any necessary work done. Maybe when we finish our basement a million years from now, we can assign part of that space to be an office….but then again, maybe not. ;)}
Anywho, after months of searching, I finally stumbled upon a cabinet that fit all of my criteria, was within my budget and was only a couple miles from my house! Hallelujah! {Speaking of which, thank gosh it was so close to my house because it BARELY fit in the car, and if I had to get on some sort of highway versus the back roads I was taking, I’m pretty sure it would have fallen out of the trunk and smashed onto the pavement.}
Here is the boring and functional piece of furniture I purchased. I don’t have any photos of it together because the drawers were out when we got there {to make lifting and transporting easier}.


Once I got it home, it was time to sand, prime and paint. The sanding I did on the piece was very minimal. It was laminate, so I just wanted to rough up the surface a bit. Then a few days later I got around to priming the piece. Instead of using regular primer, I used my favorite Kilz spray paint primer. That dried quickly, but it still took me a couple more days to get around to painting the piece. Whoooops!
I decided it’d be fun {and economical} to use the leftover yellow paint I had from when I made over the Craigslist’ed nightstands in our guest bedroom. The happy yellow totally transformed the cabinet! Originally I thought I would switch out the hardware on the piece, but after it was painted, the original stuff looked perfect!


Anyone else have tackle a furniture makeover lately? I feel it’s becoming second nature for me to make over Craigslist finds! :)
Bye-bye Blanco!
June 05, 2012
I love white. It's clean, it's modern...it's light and airy. But too much of it is just plain boooooooring.
Enter this area of our home....

White ceiling + white trim + white door + ginormous white barn door = bleh. Okay, maybe “bleh” is a little harsh. Let’s use sterile instead. ;)
So with a little paint and a little effort, our front door went from boring white...

...to a fun, icy blue!

Of course the addition of an old mirror and a couple new frames also helped to spruce up the space a bit. Sometimes I am still amazed at how a splash of color and a couple accessories can make a space feel more and more like home.
Yay for crossing more things off the "to-do" list...no matter how small they may be!! :)
Enter this area of our home....


White ceiling + white trim + white door + ginormous white barn door = bleh. Okay, maybe “bleh” is a little harsh. Let’s use sterile instead. ;)
So with a little paint and a little effort, our front door went from boring white...


...to a fun, icy blue!


Of course the addition of an old mirror and a couple new frames also helped to spruce up the space a bit. Sometimes I am still amazed at how a splash of color and a couple accessories can make a space feel more and more like home.
Yay for crossing more things off the "to-do" list...no matter how small they may be!! :)
Meanwhile...
April 24, 2012
While us kiddies were busy getting our planting on, my parents were taking care of a couple painting projects still left around the house. {I would love to know how many gallons of paint we have purchased for our house thus far...hmmmm.}
First on their list was to get the exterior trim painted. Then it was time to tackle project numero dos....our back porch.
Here is a little reminder of what our {soon-to-be-one-of-our-favorite-spots-in-the-house-once-it-gets-fixed-up} screened-in porch looked like when we bought the house.


Since these icky pictures were taken, we have given the porch some major TLC. It's been cleaned a bagillion times, the light fixtures and fan have been replaced, the door into the house has been replaced and I removed the {security???} chicken wire that surrounded the bottom portion of the space.
And as of last week, my dad painted the ceiling a bright white, my mom filled all the holes in the wood supports, painted all the supports to match the house and my dad painted the floor to match our shutters.


While the difference might not translate that well in pictures, I assure you...it looks a million times better. And we still have several steps to go. We need to replace the screening, add lattice to the bottom of the structure, replace the outside door, and have new {not rotten} steps built. Plus, I'm thinking of doing some sort of stenciling the floor!!
Oh, and we'd loveeeeeeeeee to add a big stamped concrete patio to the area next to the porch. That'd mean replacing that decaying grill outside, running the gas line to a more appropriate area where we want the grill and spending lots of money that we just don't have haaaaaa. We had someone come give us an estimate for the work, and while his price is totally reasonable for what we'd get done, it's just not going to be in the cards for a few years. We'll have to learn to embrace our weird, wonky backyard for now!
Anyone else planning and dreaming of outdoor makeovers?!?
First on their list was to get the exterior trim painted. Then it was time to tackle project numero dos....our back porch.
Here is a little reminder of what our {soon-to-be-one-of-our-favorite-spots-in-the-house-once-it-gets-fixed-up} screened-in porch looked like when we bought the house.


Since these icky pictures were taken, we have given the porch some major TLC. It's been cleaned a bagillion times, the light fixtures and fan have been replaced, the door into the house has been replaced and I removed the {security???} chicken wire that surrounded the bottom portion of the space.
And as of last week, my dad painted the ceiling a bright white, my mom filled all the holes in the wood supports, painted all the supports to match the house and my dad painted the floor to match our shutters.
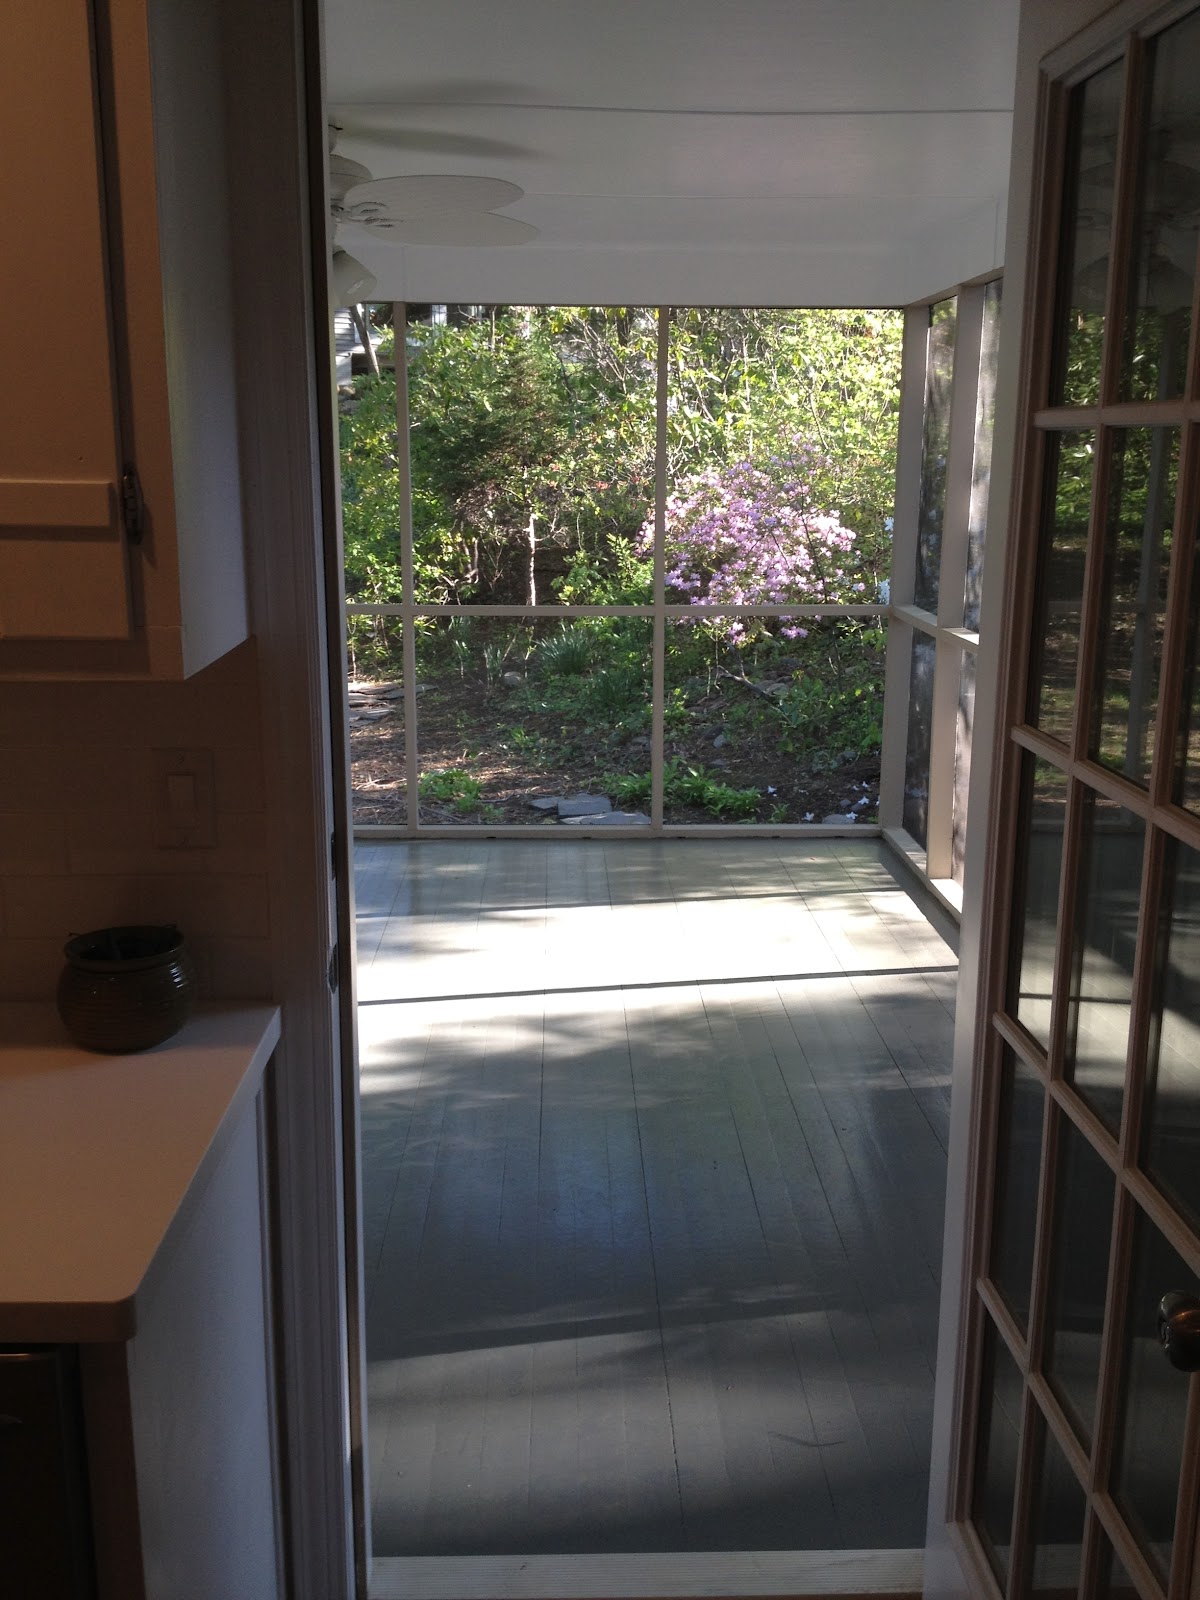


While the difference might not translate that well in pictures, I assure you...it looks a million times better. And we still have several steps to go. We need to replace the screening, add lattice to the bottom of the structure, replace the outside door, and have new {not rotten} steps built. Plus, I'm thinking of doing some sort of stenciling the floor!!
Oh, and we'd loveeeeeeeeee to add a big stamped concrete patio to the area next to the porch. That'd mean replacing that decaying grill outside, running the gas line to a more appropriate area where we want the grill and spending lots of money that we just don't have haaaaaa. We had someone come give us an estimate for the work, and while his price is totally reasonable for what we'd get done, it's just not going to be in the cards for a few years. We'll have to learn to embrace our weird, wonky backyard for now!
Anyone else planning and dreaming of outdoor makeovers?!?
Love Thy Neighbor...
April 19, 2012
And boy do we love our neighbors! My hubby and I have been blessed with some of the greatest neighbors {and neighborhood} around. In fact, we have grown really close to the couple who lives directly across the street from us. We have a lot in common with them {newly married, same age, just bought their house a couple months before us, are in the process of fixing up their 1950’s rancher, etc.} and they are a ton of fun to hang out with.
You might be wondering why I’m talking about my neighbors since my last post spoke about how my parents were visiting for my birthday weekend, and we had a ton of work to get done on the outside of our house. Well the answer to that is simple. Not only was our house on our “to-do” list…but so was our neighbors'. {Yup, that’s right...my parents’ UH-mazing generosity extends to our neighbors as well.}
You see, their house was due for a paint job. The dingy white just wasn’t cutting it anymore. When we heard them talking about painting their place, my parent’s offered up our services immediately. {Remember how ugly our house was before we attacked it with some paint?!?!} The six of us could get the job completed MUCH faster than the two of them getting to it when they found the time during the week. So bright and early on Saturday morning, me, Pete and my parents headed down our front yard to get to work with our neighbors.
By the time I got outside, their house looked like this {sorry, I don’t have a true “before”}…

…and by 3:30 in the afternoon, it was double-coated and looked like this...
{View from our front door.}

{Again..a little closer.}

{View from their driveway. Ummm, yea my Dad was on a large ladder doing the peaks.}

{View from their backyard. Again, my Dad and his long reach took care of the peaks.}

Not too shabby for a days worth of work! The new color adds so much warmth to their home...and I even think it makes the place appear larger. They still need to paint their door an accent color {in the cranberry family} and hang their black shutters...but considering how dramatic the change is already, I can’t wait to see what it looks like with everything in place! :)
Anyone else take on a daunting task with the help of some loved ones?!?!
P.S. - Three years ago, today, my best friend asked me to marry him. <3 Here are some pictures captured during the proposal. {Please don't judge my yoga pants and hoodie...clearly, I had NO idea it was coming, or I would have dressed for the occasion. ;)}


Subscribe to:
Posts (Atom)